Generate
Scaffold Project
Scaffold a Test Maker project with the following command:
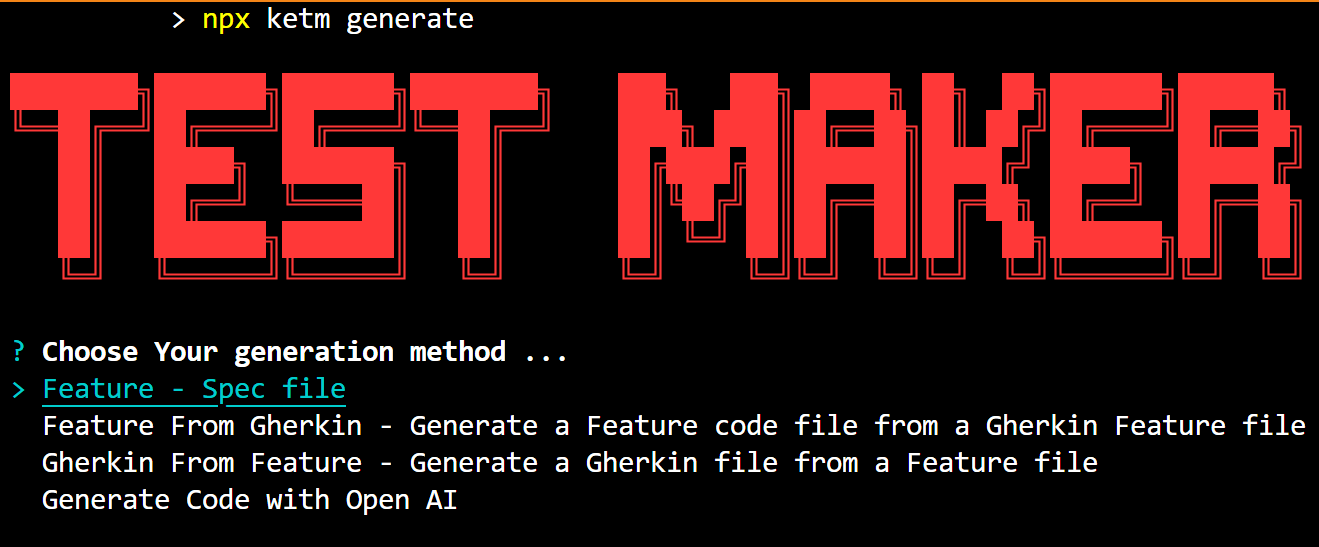
npx ketm generate
This command presents various options for generating different types of files. Here's a breakdown of the available options:
-
Feature - Spec file: This option initiates the generation process for a feature specification file. It allows you to define features, scenarios, and steps using the Test Maker syntax.
-
Feature From Gherkin: Selecting this option generates a feature code file from an existing Gherkin feature file. It converts Gherkin syntax into Test Maker feature syntax, providing compatibility between different testing frameworks.
-
Gherkin From Feature: This option generates a Gherkin file from a Test Maker feature file. It's useful for scenarios where Gherkin syntax is preferred or required, such as when collaborating with teams using Cucumber or similar tools.
-
Generate Code with Open AI: Choosing this option enables the generation of code using OpenAI's natural language processing capabilities. It allows you to describe the desired behavior in natural language, and the AI engine generates the corresponding code.
Each option serves a specific purpose, catering to different workflows and preferences.
Feature - Spec file
- Choose Your Generation Method: You'll be prompted to choose a generation method from the available options. These options include generating a feature file with different combinations of given, when, and then steps, generating a feature code file from a Gherkin feature file, generating a Gherkin file from a feature file, or generating code with OpenAI.
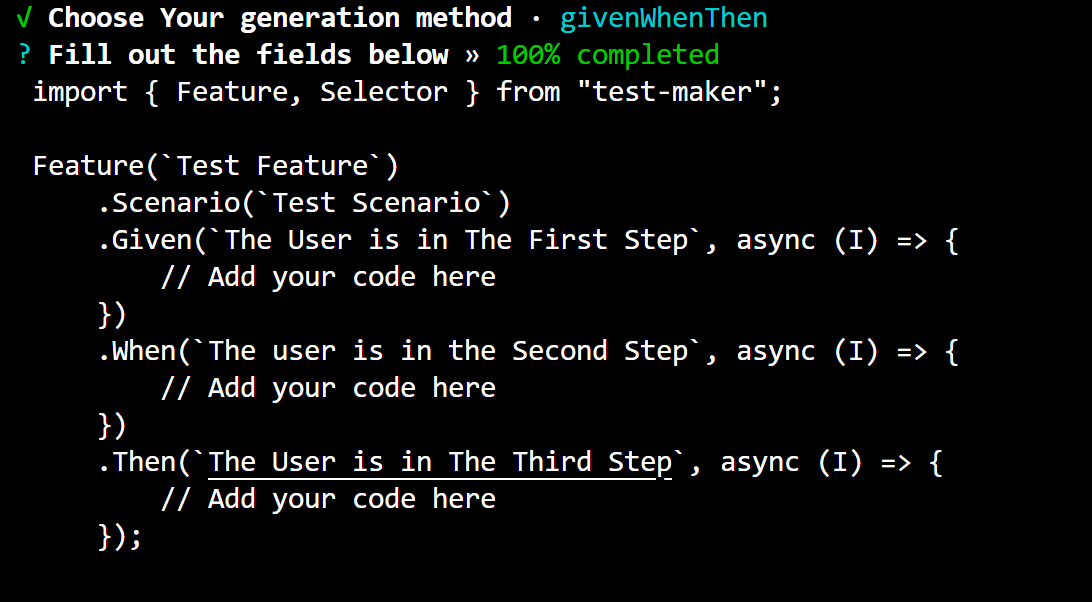
- Fill Out the Fields: After selecting the generation method, you'll need to fill out the necessary fields. For example, if you choose to generate a feature file with given steps, you'll be prompted to provide the feature name, scenario name, and given step name. As you fill out these fields, you'll see a progress bar indicating the completion percentage.
-
File Name Confirmation: Once you've filled out the fields, you'll have the option to confirm the file name. If you choose not to use the default file name, you can specify a custom name.
- If you choose to use the default file name, press 'y'.
- If you want to specify a custom file name, press 'n' and enter the desired file name.

- File Generation: After confirming the file name, the feature specification file will be generated. You'll receive a confirmation message indicating the successful generation of the file, along with the file path.
Feature From Gherkin
Here's the breakdown of the steps involved in generating a feature code file from an existing Gherkin feature file:
- Choose Your Generation Method: Select the option "Feature From Gherkin" to initiate the process.

- Choose Gherkin Files Location: You have the option to select either the default location or choose a custom location for your Gherkin files. If you choose the custom option, you'll need to specify the new custom location. In this case, the custom location chosen is
./features, which is a relative path.

- Choose Generated Features Files Location: Similar to the previous step, you can choose between the default location or a custom location for the generated feature files. Again, if you opt for the custom option, you'll need to specify the new custom location. Here, the custom location chosen is
./src/specs/generated-features.

-
Choose What to Generate: You have the option to generate features from all files or choose specific files to generate from. To select a file, use the arrow keys to navigate to the desired file, press the space key to select it (the circle next to the file will be filled), and then press the Enter key. If you don't select any files and press Enter, you'll see a message
No items were selected.
-
Conversion Process: The selected Gherkin file (
example1.feature) is converted into a feature code file (example1-spec.ts). The content ofexample1.featureis translated into Test Maker syntax and written into the generated feature file.

The generated feature file (example1-spec.ts) contains Test Maker code corresponding to the Gherkin feature and scenario described in example1.feature. Each step from the Gherkin file is translated into a corresponding Given, When, or Then step in the Test Maker syntax, allowing for seamless integration and execution within the Test Maker framework.
Gherkin From Feature
Here's the breakdown of the steps involved in generating a Gherkin file from a feature code file:
- Choose Your Generation Method: Select the option "Gherkin From Feature" to initiate the process.

-
Choose Feature Files Location: You have the option to select either the default location or choose a custom location for your feature files. In this case, the default location is selected, which is
/Users/your_user/example_project/src/specs.
-
Choose Generated Gherkin Files Location: Similar to the feature files location, you can choose between the default location or a custom location for the generated Gherkin files. Here, the default location is chosen, which is
/Users/your_user/example_project/generated/gherkin.

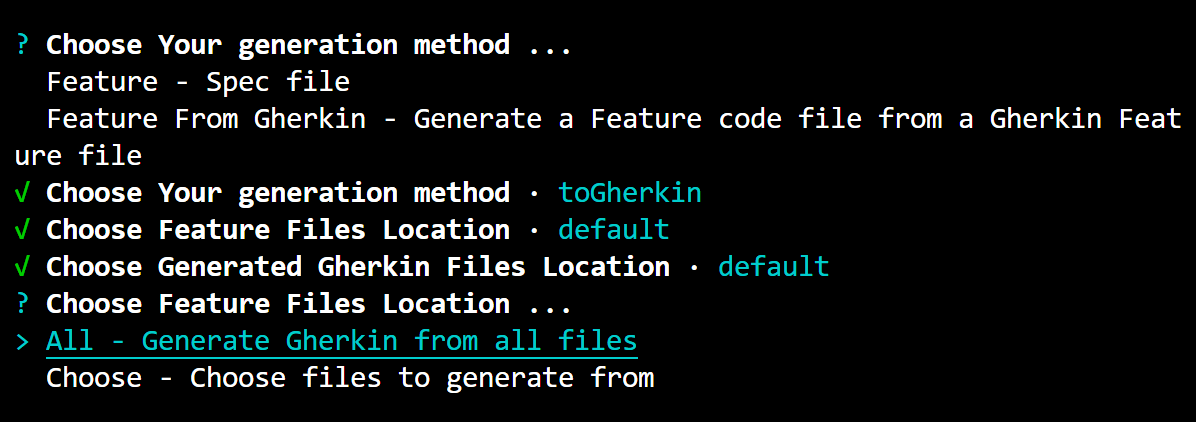
- Choose What to Generate: You have the option to generate Gherkin from all files or choose specific files to generate from. To select a file, use the arrow keys to navigate to the desired file, press the space key to select it (the circle next to the file will be filled), and then press the Enter key. If you don't select any files and press Enter, you'll see a message
No items were selected.
- Conversion Process: The selected feature code file (
example-spec.ts) is converted into a Gherkin file (example-spec.feature). The content ofexample-spec.tsis translated into Gherkin syntax and written into the generated Gherkin file.
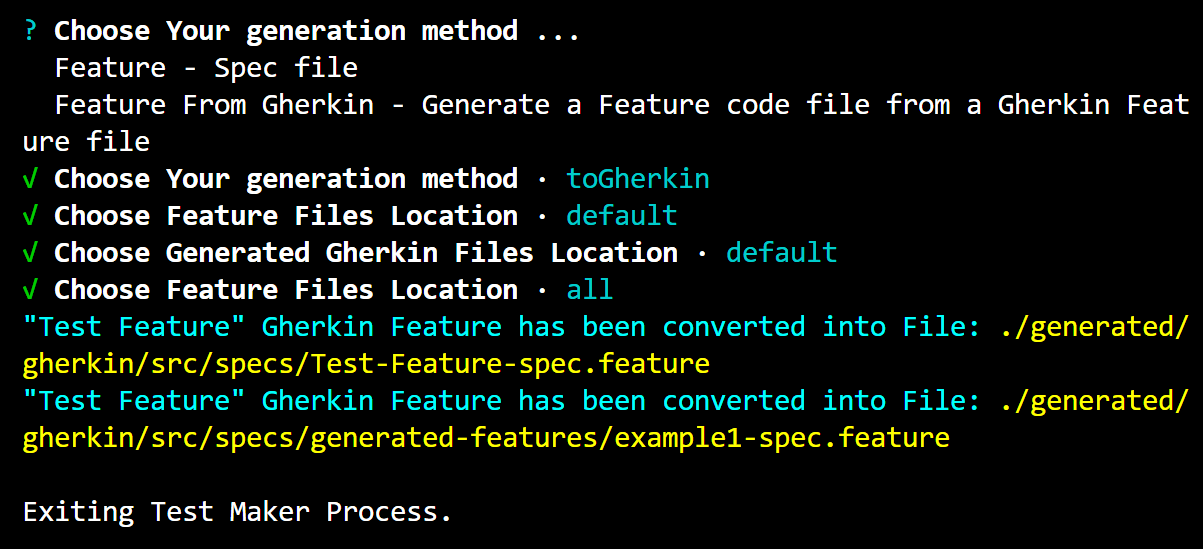
The generated Gherkin file (example-spec.feature) contains a Gherkin feature and scenario corresponding to the Test Maker feature and scenario described in example-spec.ts. Each Given, When, or Then step from the Test Maker syntax is translated into a corresponding step in the Gherkin syntax, allowing for seamless integration with tools that support Gherkin-based testing frameworks.
Please note that "your_user" and "example_project" should be replaced with actual usernames and project names as needed.
Generate Code with Open AI
This command initiates the process of generating code based on a user's input using OpenAI.
It's crucial to have the ./test-maker-openai-config.json file with the apiKey field containing your OpenAI API key for the code generation process to work seamlessly. Without this key, the Test Maker CLI won't be able to authenticate and access the OpenAI services needed for generating code based on your input.
Here's an example of how the test-maker-openai-config.json file could be structured:
{
  "apiKey": "YOUR_OPENAI_API_KEY"
}
Replace "YOUR_OPENAI_API_KEY" with your actual OpenAI API key. This configuration file ensures that the Test Maker CLI can securely communicate with the OpenAI platform and utilize its capabilities for code generation.
Here's a breakdown of the steps involved:
-
Choose Your Generation Method: You'll be prompted to select the "Generate Code with Open AI" option. This option utilizes OpenAI's natural language processing capabilities to generate code based on the user's input.
-
Provide Input: After selecting the generation method, you'll need to provide input for the code generation. In this example, the input provided is "Generate a random journey of a user on any e-commerce website".
-
Generated Code: Based on the provided input, the OpenAI engine generates a code structure for a random journey of a user on an e-commerce website. The generated code is presented in TypeScript format and follows the structure of a Test Maker feature file.
-
Verification and Customization: It's important to verify the generated code and ensure its accuracy. You may need to customize the selector values, actions, or other details to fit your specific requirements. Additionally, the generated code is wrapped in
<pre><code>tags for readability. -
Additional Input: After reviewing the generated code, you have the option to provide additional input for generating more code. If you have no further requests, you can exit the process by pressing Enter.
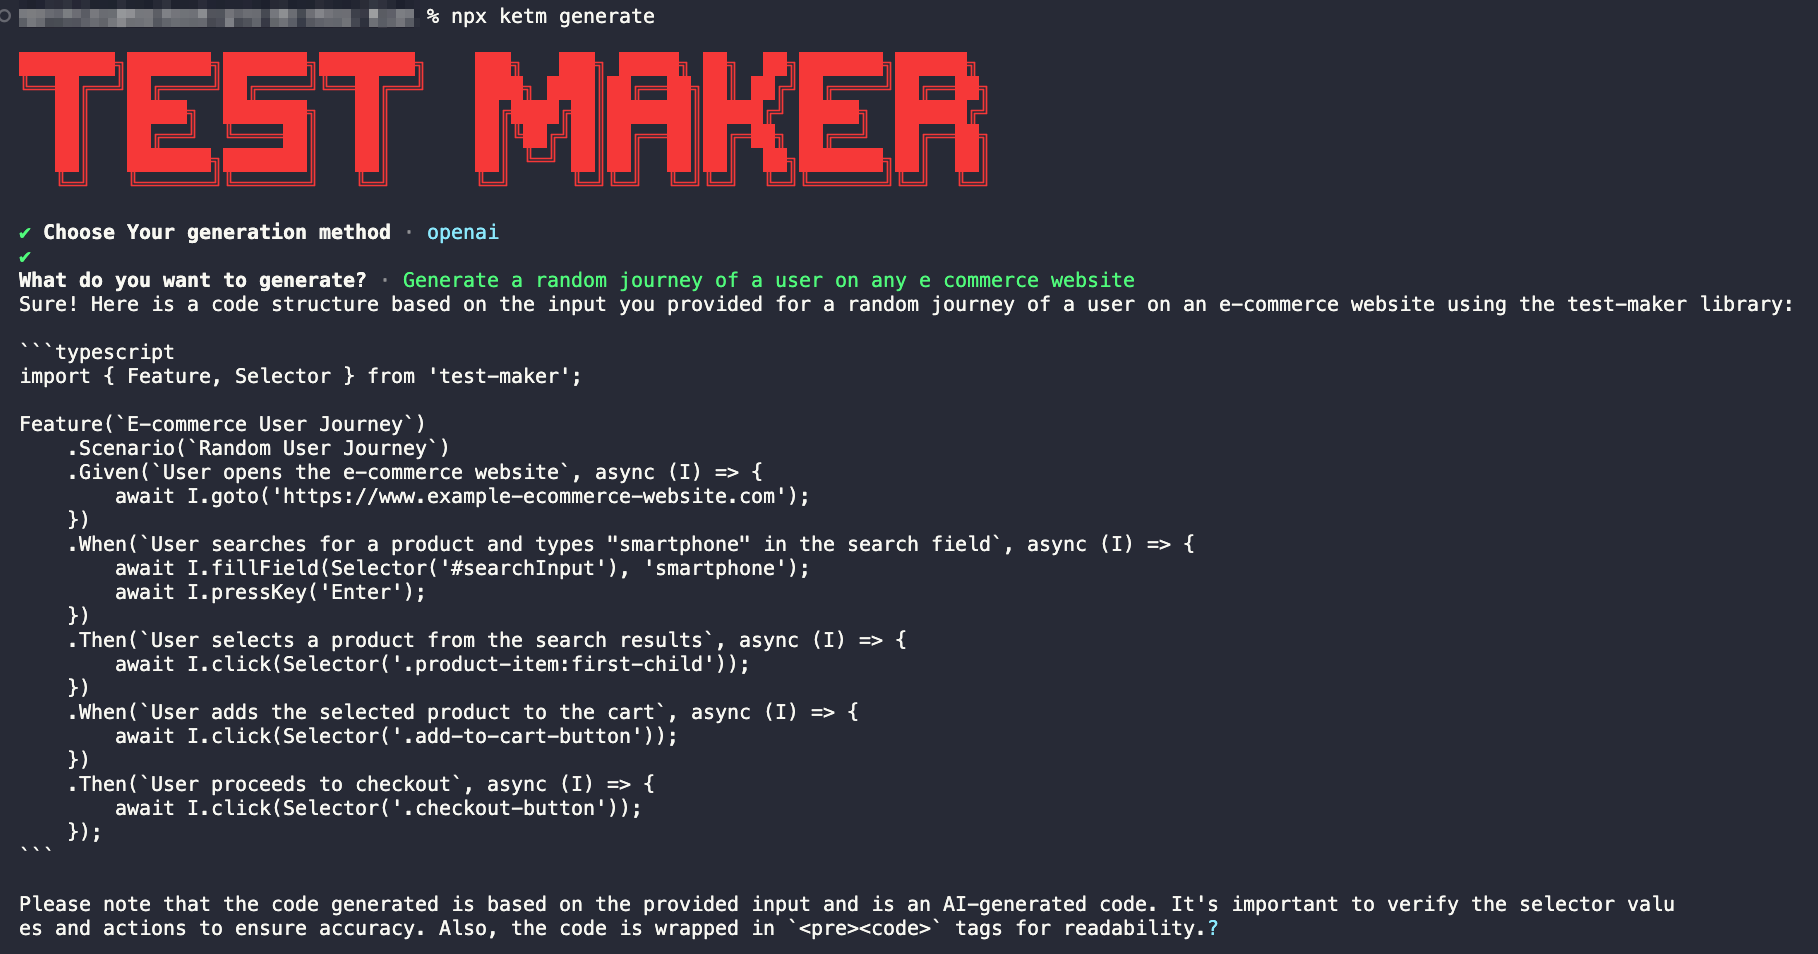
This process allows for the rapid generation of code snippets based on natural language input, leveraging the power of OpenAI's language model.