Quick Start
Installation
Requirements
Before proceeding, ensure that you have met the system requirements.
Project Setup
-
Create a project folder for your tests, e.g.,
my-test-project(avoid spaces in the path). -
Open a Command-Line prompt (CMD) and navigate to the project folder.
Initialize the Project
Initialize the project by running the following command:
npm init
-
Fill out the required details or press enter to accept the default values (if you don't have any specific requirements, hitting enter for all is ok, and default values will be set for you). You can also add -y after the word init in the command above.
-
Now you will see a new package.json file, created for you, that will act as the manifest for your project.
{
  "name": "my-test-project",
  "version": "1.0.0",
  "main": "index.js",
  "scripts": {
    "test": "echo \"Error: no test specified\" && exit 1"
  },
  "author": "",
  "license": "ISC",
  "description": ""
}
Install Test Maker
Download Test Maker as a compressed file and add it to your project folder.
- If a compressed Test Maker file has been shared with you, install it using npm:
As part of source control we recommend having Test Maker file inside the project folder.
npm i '/Users/your_user/project_name/test-maker-8.0.0.tgz'
- For users with an earlier version of Test Maker, you may need to use the "--ignore-scripts" option:
npm i --ignore-scripts test-maker-7.5.5.tar.gz
Generate Test Maker project template
From CMD, just run the following:
npx ketm init
You will get something similar to the image below:
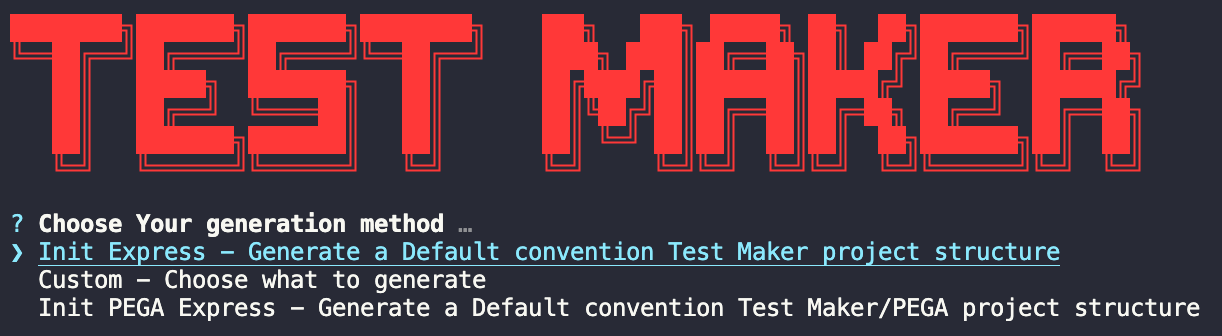
You have multiple options to choose from to initialize a Test Maker project:
express: creates the default skeleton structure. custom: gives you the control over what to generate.
If you choose express, you will see the list of files, and scripts Test Maker created in your project folder.